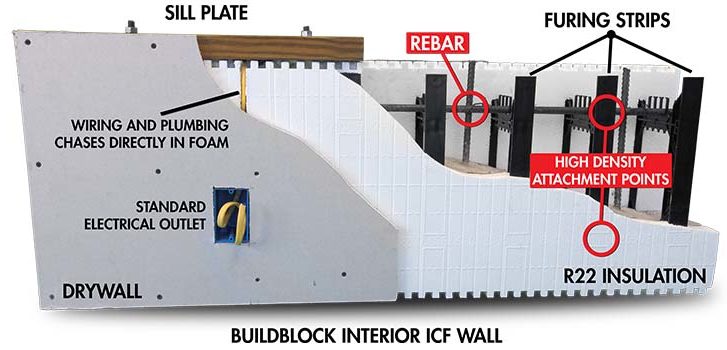
How to Build: Electrical & Plumbing Rough-Ins

Electrical and plumbing services are easy to add to BuildBlock walls. When making a horizontal chase, it’s best to be done where the blocks connect to one another. Vertical runs can be made in the foam between the ties. You have 21/2” of foam available to remove to make a hole for boxes. Most boxes are 21/2” to 23/4” deep, so with a 1/2” sheetrock return, there is plenty of space available.

There is 1” of space between vertical webs at each horizontal block course connection to allow wiring and small plumbing to run horizontally through a wall.

NOTE: Check (or ask your electrician to check) the new NEC codebook for electric box connectivity to ICF walls. If they are no longer permitting you to connect the box to the concrete, you must use a tab side-mounted box and attach the box to one of the tabs. Additional foam gluing will secure the box better.

See ICFs in action & learn more about building with icfs!

Plumbing

Plumbing is achieved in the same manner by creating chases in the foam and using adhesive foam to secure any pipes in place. Keep in mind you will not be able to use a pipe diameter larger than 21/2” in the walls, from the foam to the concrete. For larger pipe runs, choose an inside wood-framed wall. (2” schedule 40 pipe is approximately 21/2 OD.)

It is not recommended that you run plumbing in the void of an ICF wall and then pour concrete around it unless necessary. This is because it has a tendency to create voiding and is unrecoverable should the pipe fail. If using plumbing inside a wall cavity, extra vibrating will be required to allow for proper consolidation.

It’s also important when planning your project, it is always wise to consult with any trade that the ICF wall will impact. This helps each trade prepare for their respective installations and alterations, if any, to those methods or materials more suited for ICF job sites.

Note: Place all wiring as deep into the foam as possible to meet code requirements and keep inspectors happy. Check local requirements.

Installing Utility Access

Utility access is a very important step in planning, prior to concrete placement. Access ports may include:

  • Gas
  • Electric
  • Plumbing
  • Water 
  • Communications

Sleeves

Lastly, to accommodate services that pass through outside walls, service sleeves must be installed prior to pouring. Otherwise, you must bore through the concrete! A little planning here will save you drilling into concrete that has hardened beyond its yield strength by two-thirds or more. Access ports are easy to install by inserting a PVC pipe into the wall. Even if you are not sure if you have service in that wall or not. 

  • You can sawtooth-cut a wider-than-wall piece of PVC and use it to bore into the foam.
  • Make an imprint in the foam with the PVC sleeve; then use a long keyhole saw to cut through the foam.
  • Make another imprint, cut the other side. Insert the sleeve and secure with adhesive foam. Brace or scab if necessary. You can cut off any excess PVC pipe at a later time.